Managing your Aircraft (Resources)
Getting started with managing your core resources such as aircraft, helicopters and simulators.
Introduction to Aircraft Administration
Aircraft administration, including creating, editing, deactivating, and logging setup, is managed in the Administration section. These settings define how flight data is recorded, reported, and integrated across FlightLogger.
To create new resources such as aircraft, helicopters, and simulators, make sure you have the permissions to do so..
*Note: Learn more about Permissions in our article Permissions
Go to Administration → Aircraft.

Creating new aircraft models
Choose the tab called Aircraft models.

You will see a list of all existing aircraft models, both active and inactive. This includes aircraft, helicopters, and simulators.
Tools on the Aircraft Models page
On the aircraft models list, you will see several columns:
- Model name: Opens the profile page with the uploaded image for the aircraft, helicopter, or simulator.
- Circle icon: Lets you synchronize the model with your calendar.
- Pencil icon: Opens the edit page.
- Green activation button: Used to deactivate (or activate) a specific model.
- Up and down arrows: Change the order of the model.

From this page, click the tab called Create aircraft model.

Now create the aircraft model.
- Set the name (e.g., Robinson 22).
- Choose the type (aircraft or helicopter).
- Choose the class (single, multi, or simulator).
- Optionally, upload an image.
Select Update aircraft model.
After the model is created, it will appear on your active model list.

*Note: Next to the model name, type, and class, you will see an asterisk icon. In FlightLogger, any field marked with an asterisk is mandatory. You must enter information in these fields; otherwise, you cannot create the item, whether it’s a new user, an aircraft, or anything else..
Creating a New Aircraft, helicopter or Simulator
Return to the Aircraft page to create the specific aircraft linked to that model.
Click Create Aircraft .

Enter the following details:
- Call sign
- Model: Select from the drop-down list of active models. The type and class will be filled automatically based on the model.
- Fuel coefficient: From the pilot operating handbook. Choose liters or US gallons.
- Oil consumption: While not filled in here, instructors can log oil usage. However, the registration unit must be set. It can be set to liters, milliliters, US quarts, or US gallons.
- Home airport: Select from your active airports.
- Rental option: Choose if this aircraft, helicopter, or simulator should be available for renters. Permissions for renters must be set separately.
Finally, click Create Aircraft. Once saved, the new aircraft, helicopter, or simulator will be added to your list of active aircraft.

Activating or Deactivating Aircraft
- Aircraft cannot be permanently deleted.
- If no longer used, you must deactivate aircraft. The aircraft will appear on the Deactivated page.
- You can always reactivate them later if needed.
*Note: Only active aircraft will appear on the bookings page as bookable resources.

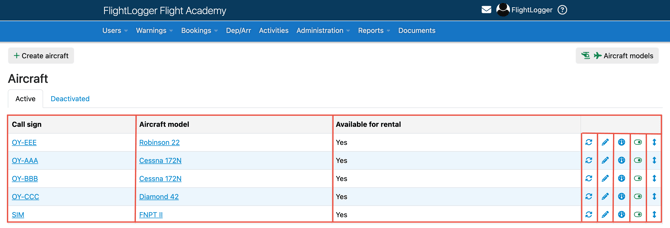
Tools on the Aircraft page
On the Aircraft page, you will find eight columns:
- Call sign: Clicking on the specific callsign opens the aircraft profile page.
- Aircraft model name: Opens the profile page with the uploaded image for the aircraft, helicopter, or simulator.
- Available for rent: Shows whether rental access is enabled for the aircraft.
- Circle icon: Lets you synchronize the aircraft with your calendar.
- Edit/Pencil icon: Opens the edit page for additional information and settings.
- Clock/timer icon: Opens the flight log page, where you set up the timers for the aircraft (explained in more detail below).
- Green activation button: Used to deactivate (or activate) a specific model.
- Up and down arrows: Change the order of the aircraft.

Editing an existing Aircraft Call Sign
Should you need to change the call sign of an existing aircraft in FlightLogger (for example, from OY-AAA to OY-BBB), all previous and future flights will automatically show the new call sign.
- Times and landings already registered will remain the same.
- Booking dates and times will also stay the same, but the call sign will update throughout.
Recommendation
If you want the original call sign to remain visible on all previous flights and bookings, follow these steps instead:
- Create a new aircraft with the new call sign (As explained above).
- Move current bookings from the current aircraft (OY-AAA) to the new one (OY-BBB).
- Deactivate the old aircraft (OY-AAA). All previous flights and reports will still display this call sign.
- Update aircraft tracking under Administration → Account Settings → Flight Tracking.
- If you have any prices set up on the old aircraft, make sure to copy them to the new one.
Need help?
If you need assistance creating or structuring your training programs, feel free to contact our support team via the Get Support button inside FlightLogger