
Log in and check your profile
When your user profile has been created, you will receive a welcome email from Flight Logger. Use the link in that email to set up your login.
Please refer to the following article on logging in for the first time. Getting started as a new user: The Registration and Login Process
After logging in, start by checking your own user profile and fill out any missing information.
What is an administrator?
An administrator is a user with broad access to manage your organization’s FlightLogger account.
Administrators can typically help with:
- creating and updating company employees/users (not students, this is given through permissions)
- assigning user roles and permissions
- managing account settings
- maintaining training and user information
- managing booking and registration settings
- working with certificates, warnings, and compliance-related setup
- reviewing operational data and reports
- supporting instructors, students, staff, and other users when they cannot access or complete a task
In short, administrators are the super users of your FlightLogger account.
When should someone be made an administrator?
Only give administrator access to users who need broad control over the system.
A good administrator is usually someone who is responsible for one or more of these areas:
- training administration
- scheduling and operations
- compliance or quality management
- user access management
- account setup and configuration
- certificate or documentation control
Avoid giving administrator access only because a user is missing one small function. In many cases, a more specific permission may be better.
*Note: Keep the number of administrators as low as practical. This helps protect sensitive data and prevents accidental changes to account-wide settings.
*Note: Administrator default access. In FlightLogger, and some areas are reserved for administrators by default, even when optional permissions and account settings are disabled. Other access depends on the roles, permissions, and account settings configured for each user, including other administrators.
Your first steps as a new administrator
As a new administrator, once you have successfully logged in, we recommend reviewing the following areas.
1. Check your own user profile
Start by confirming that your own profile is correct.
To do this:
Step 1: Head to Your Profile
Click on your Name in the top right corner of your screen, then select Profile from the options.
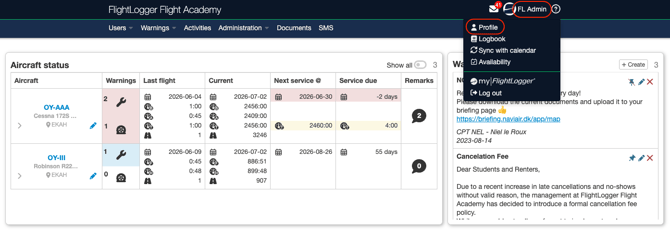
Step 2: Open Your Settings
Once you are on your profile page, click on the Settings button and select Edit Info from the drop-down menu.
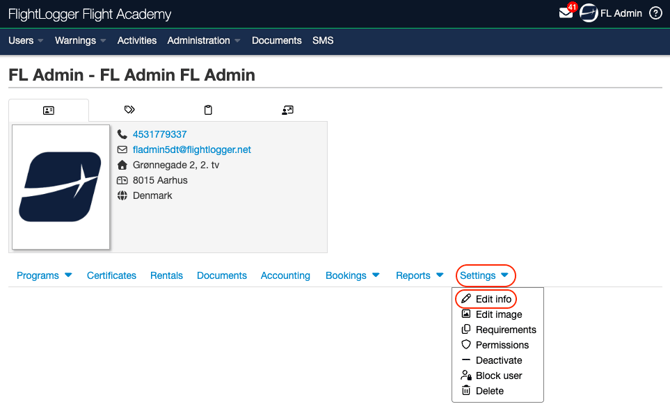
Step 3: Fill Out Your Details
Fill out the necessary information fields on this page. Don't forget to click Save when you're done.
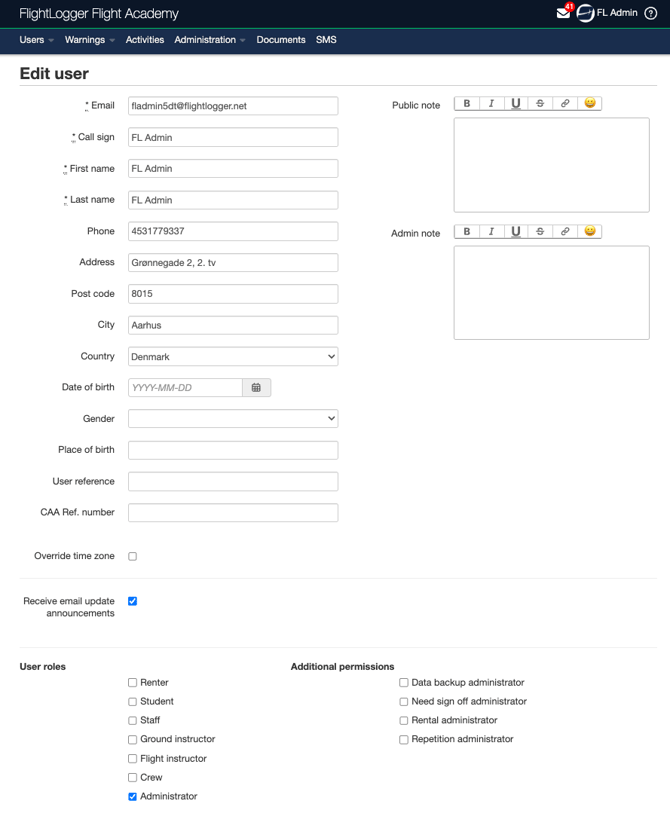
Remember to check:
- your name, surname and callsign
- email address
- general and emergency contact information
- decide whether you want to override the general time zones in the general settings
- whether you want to receive email updates and announcements from FlightLogger
- assigned user roles
- additional responsibilities
- any Admin or Public notes
2. Creating and understand user roles for your employees
FlightLogger has different default user roles, and as an administrator you can create new users for the following roles.
- Flight Instructor: A certified pilot responsible for conducting hands-on flying instruction directly with students.
- Ground Instructor: An educator responsible for teaching aviation theory, ground school courses, and preparing students for their written examinations.
- Crew: Any individual within the organization holding a valid pilot certificate who handles non-training flights. This includes ferry flights, maintenance check flights, and general operational flights.
- Staff: Flying or non-flying personnel who manage the day-to-day operations of the organization. Their duties typically include scheduling, verifying pilot certificates, handling compliance, and administrative tasks etc.
- Renter: Customers who hold the appropriate licenses and ratings to rent the organization's assets (such as airplanes or helicopters) for personal use.
- Administrator: High-level users in charge of specific organizational departments, such as training or scheduling, or members of the management team. They hold elevated system privileges to oversee operations, manage configurations, and control access within their respective domains.
- Guest: External users granted restricted, read-only access to the system. They can only view specific user(s) profiles or limited information as explicitly permitted by the administrator.
A user can have more than one role. For example, someone may be both an instructor and an administrator.
The administrator role gives broad access, but as mentioned above, some features depend on additional permissions, account settings, or designated user roles.
*Note: By default, creating student profiles is not a standard administrator right. Because student onboarding typically goes through a specific department or designated personnel (such as the admissions team or a student registrar), this capability must be explicitly granted through user group (or personal) permissions settings.
To add a new employee/user to the organization, follow these steps:
Navigate to the Users tab: Open the drop-down menu and click on the specific user role you want to assign to this person.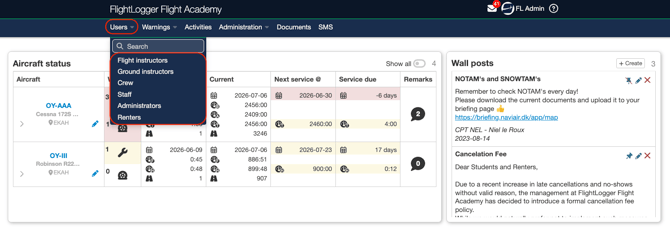
Create the Profile: Once on the user role page, click Create.
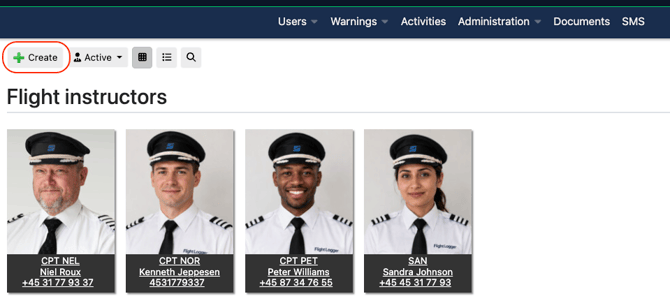
Fill in the Details: Complete the required fields with the employee's information (similar to the details on your own profile).
*Note: The first four fields marked with an asterisk (*) are strictly mandatory. The system will not allow you to create the user profile if these are left blank. All other remaining fields are optional during setup. If you prefer, you can leave them blank and allow the users to fill in the rest of their personal details themselves after they have successfully registered and logged into the system. The first four fields are:
-
Email
-
Call Sign
-
First Name
-
Last Name
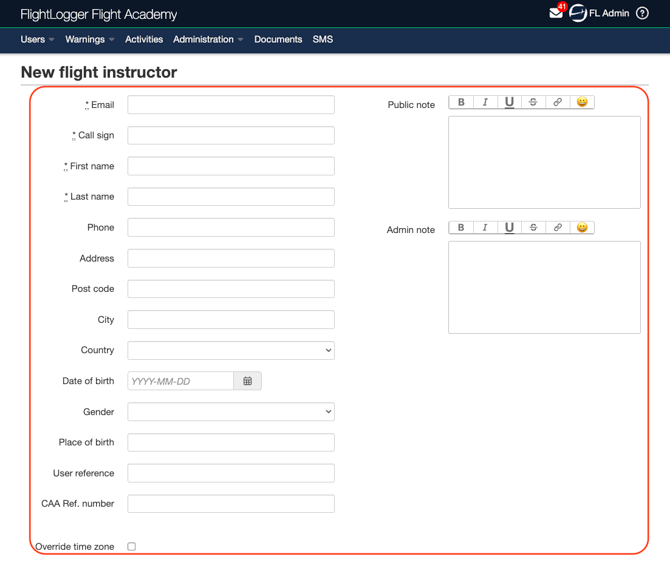
Assign Multiple Roles (Optional): Scroll to the bottom of the page to add additional user roles, either immediately or at a later date.
*Note: A single user can hold multiple roles simultaneously, meaning you do not need to create separate profiles for the same person. While the system will allow you to create duplicate profiles, please note that the system will not allow the same email address to be used for more than one profile within your account. Assigning multiple roles to one profile is the best and recomended practice.
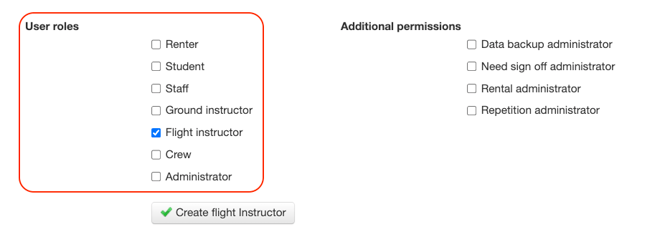
Additional Permissions & Modules: Depending on your account subcsription, you can assign these specialized administrative permissions to specific users:
- Data Backup Administrator: Grants oversight of the data backup module (if your orginisation has purchased this module). This user(s) receives automated alerts if the connected storage (Dropbox or OneDrive) is nearing full capacity.
- Need Sign-Off Administrator: This user(s) can monitor the status of all document sign-offs across the entire organization via the Message Center to see what has been completed and what is still pending.
- Rental Administrator: Authorizes the user(s) to manage and approve incoming aircraft or helicopter rental requests.
- Repetition Administrator: Designed for leadership roles such as the Head of Training or Chief Flight Instructor. This user receives an automated email notification every time a student's training exercise is flagged as "below standard," allowing for immediate quality control.
3.The Front Page Overview
For more information, please see the following article on the Dashboard / Front Page Overview.
4. Review permissions carefully
Permissions control access to specific areas or actions in FlightLogger.
As an administrators, you have to assign permissions to either a whole user group or an individual user(s).
Examples may include booking management, certificate access, reports, registration actions etc.
Best Practices: Before Granting or Changing Permissions
Before modifying user permissions or assigning administrative rights, ask yourself the following critical questions to maintain security and optimize workflows:
- What does this specific user actually need to do? Align permissions strictly with operational roles. For example, the scheduling department genuinely needs booking permissions, but other departments may not.
- Is full Administrator access truly required? Avoid granting broad administrative access if a user only needs it for a single routine task. If you do not create bookings as part of your daily routine, it is better to set your own access to "Overview" (read-only). This restricts accidental changes and significantly lightens your operational workload.
- Can a specific permission replace broad access? Instead of giving a permission to an entire user group, use granular settings to grant that specific permission to a single individual(s) who actually requires it.
- Could this access expose sensitive data? Be highly cautious when granting access to access permissions like Reports. Reviewing financial, operational, or personal data should be restricted to trusted, necessary roles to protect organizational privacy.
- Should this user be able to change account-wide settings? Keep system-wide configurations strictly at the core management level. Broad permissions often include the power to create, edit, or permanently delete student profiles and critical system data.
*Note: Best practise might dictate the use the lowest access level that still allows the user to do their job.
Refer to this article for more information regarding the setup of Permissions.
*Note: Regarding the two Financial Modules, f your organization has the QuickBooks and User Balance modules enabled, their corresponding permission settings will be included as separate Permission categories.
4. Account settings
As an administrator, you have access to the Account settings. Account settings control how FlightLogger works for your organization.
Accessing and Managing Account Settings
To view or modify your organization's account settings, follow these steps:
Open the Administration drop-down menu and click on Account Settings.
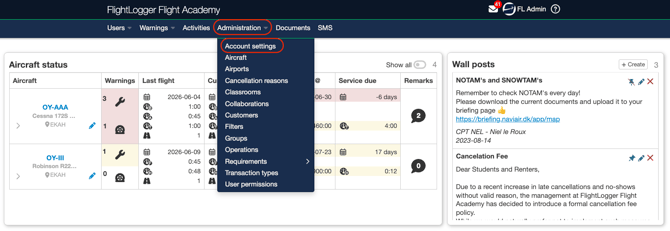
Account Configurations: This will open the core settings page.
*Note: Any configurations chosen here are applied account-wide and will affect all users globally.
Manage Module Settings: Scroll to the bottom of the page to find dedicated sections for any specific modules your organization has subscribed to, allowing you to configure their specialized settings as well.
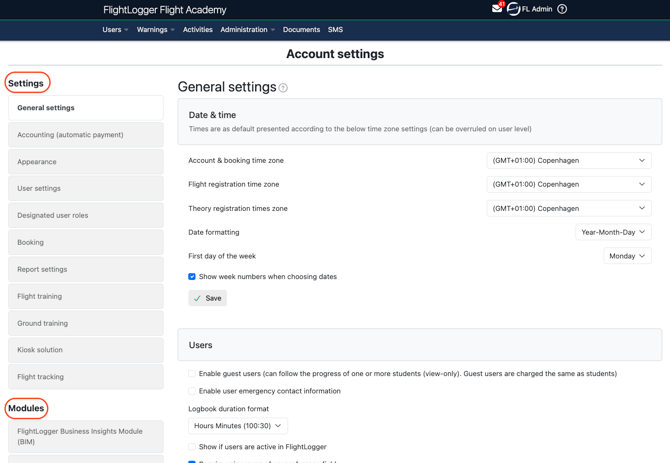
*Note: Our best practice advice is that before changing an account-wide setting, take a screenshot or note the previous setup. This makes it easier to restore the old configuration if needed.
Refer to the following articles for a step by step guide regarding the setup of Account Settings.
5. Administrator Overview: The Administration Menu
As an administrator, the Administration drop-down menu is your central control hub. Apart from Account Settings and User Permissions, this is the specific area where you will set up and manage the following items step by step:
- Aircraft
- Airports
- Cancellation reasons
- Classrooms
- Collaborations
- Customers
- Filters
- Groups
- Operations
- Programs
- Requirements
*Note: As an administrator, your default management rights for Requirements are structured as follows:
User Requirements: You are allowed to create and manage requirements for personnel, such as medical certificates, airport IDs, etc.
Flight Time Limitations (FTL): If your organization has subscribed to the Flight Time Limitations module, you will also have the rights within this section to create and configure both flight time limitation requirements and duty time limitation requirements.
Resource/Aircraft Requirements: To manage requirements for your resources (such as aircraft maintenance requirements), you must explicitly be granted the specific Aircraft permission within the system.
Refer to the following articles for a step by step guide regarding the setup of all these different fields: Account Setup & Administration
6. Documents
Administrators have by default full document access.
Refer to the following article about the Document center.
*Note: The Document center may include sensitive personal information. Be careful when deciding who can view these areas. Our best practice recommendation is to limit document access to users who need the documents for their daily tasks, like for compliance, training, or operational reasons.
Need help?
If you need assistance, feel free to contact our support team via the Get Support tab inside FlightLogger