Getting to know the acknowledgement and authorization workflow
FlightLogger’s Acknowledgement and Authorization workflow helps ensure that all required preflight actions are completed and documented before dispatching a flight.
This workflow is especially useful for organizations using a dispatcher role, ensuring flights are only dispatched once instructors, students, renters, or crew have confirmed readiness and compliance.
- Each user acknowledges via their personal login
- Dispatchers oversee the process and confirm flight status
- All acknowledgements and dispatches are timestamped for documentation
This video explains the workflow and how to get started with acknowledgements and authorizations:
Enable the Workflow
To activate the workflow:
-
Go to Administration → Account Settings → Generel Settings → Acknowledgement and authorization
-
Enable "Use Acknowledgement and Authorization"
-
Customize the acknowledgement text for each user role
-
Save changes

Appoint Dispatchers
To allow a user to dispatch flights, you must grant the correct permission:
How to enable dispatch access:
-
Go to Administration → User permissions
-
Either:
-
Assign Can dispatch under Departures/Arrivals for a specific user role (e.g. Instructors, Staff), or
-
Assign it for a specific user under their personal permissions
-
-
Save your changes

Preflight: Acknowledging as Instructor, Student, Crew or Renter
Each relevant user must log in and confirm their acknowledgement:
-
Lesson flights: Student(s) and instructor
-
Operation or rental flights: PIC only
Steps for the user:
-
Log into FlightLogger
-
Go to Departure/Arrival
-
Find your upcoming flight
-
Click the acknowledgement icon
-
Read and accept the text
Student/instructor acknowledges the flight – green icon appears after confirmation

After carefully reading the acknowledgement text, simply click Acknowledge or Authorize.
Dispatcher's Workflow
The dispatcher verifies:
-
All users have ✅ green icons
-
Flight meets compliance criteria
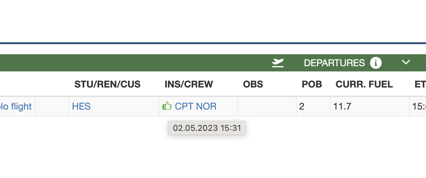
A green icon appears confirming that your acknowledgement has been registered in FlightLogger. Hovering the icon opens a timestamp of when the acknowledgement was done.

The dispatchers' responsibilities
Before dispatching a flight you should verify that all relevant users have made their acknowledgements, by confirming there's a green icon next to each user on the flight.
Once that is done, click the pencil icon to the right of the flight.
Optional warning popup and blocking feature
If preferred, you can via the account settings enable the warning popup and select rules for blocking dispatch if rules are not complied with. If this function is enabled, a popup appears when clicking the pencil icon on a booking (if not, then skip to the below section called Dispatching).
The warning popup automatically verifies all booked resources, allowing the dispatcher a quick compliance overview before dispatching. It any resources do not comply with the selected blocking rules, the dispatch will be blocked. Otherwise, the dispatcher simply clicks Continue to dispatch after making sure everything is ok.

Dispatching
This opens a popup allowing you to manage the status of the flight, again with icons displaying if acknowledgements have been made.

Once the status is changed to Flight, the dispatcher must click the Dispatch button to confirm. Note that a flight can be dispatched in FlightLogger without the acknowledgements having been done(unless you have activated the blocking function). It is therefore up to the dispatcher to manually verify this before dispatching the flight.

The flight now moves to the Arrivals section and a new green icon in the Status field confirms that the flight has been dispatched. Hovering the icon opens info about who dispatched it and when.

This information remains on the flight when set as completed and moved into the History section. From here it can be exported as a pdf, XML or CSV file, which all include the logged acknowledgement and dispatch information.
Summary
| Role | Action Required |
|---|---|
| Instructor | Acknowledge before dispatch |
| Student | Acknowledge before dispatch |
| Dispatcher | Verify & dispatch flight |
| Admin | Set up texts and rules |
Need help?
Contact FlightLogger Support via Get Support in your platform.